A2M User Guide
A2M detects the pitch of the audio and converts it into the corresponding MIDI notes in real time.
Thanks to this, you can play, e.g., the guitar, saxophone, or even sing, and simultaneously trigger sounds in virtual instruments (not only AU). These acoustic (or electric) instruments, or your voice, act as a MIDI controller.
A2M comes as an AU v3 plugin and as a standalone application (which is the AU host for this particular plugin).
The A2M is quite an unusual Audio Unit – it is both an audio effect and a MIDI effect. Due to its characteristics, it is something in between. On the one hand, it analyzes the input sound, just like any audio effect. On the other hand, it generates output MIDI events, just like any MIDI effect.
Not every Audio Unit Host supports plugins in this mode.
Compatibility
AUv3 plugin
AU Hosts compatible with A2M Audio Unit:
Audiobus, AUM, apeMatrix
A2M does not work as an AU plugin in GarageBand – on both iOS and MacOS.
A2M works (though imperfectly) as an AU plugin in Logic Pro (see below).
Standalone
The standalone version works with all MIDI-compatible applications, including GarageBand (iOS and macOS) and Logic Pro.
The app sends MIDI events via the virtual MIDI port. The list of active and inactive MIDI ports is available in the application settings in the MIDI Settings → Outputs section.
AUv3 setup
To avoid unwanted feedback, it is recommended to use headphones, or connect the instrument and monitors via the audio interface.
iOS
Audiobus
AUDIO screen
- Add a new track
- As the INPUT, select the appropriate input of the audio interface to which the physical instrument is connected (System tab)
- Select A2M as the audio effect (Audio Units tab)
- For the OUTPUT, do not select anything, leave the box blank
MIDI screen
- Add a new track
- Select A2M as the INPUT (Audio Units tab)
Since this effect is already loaded in the AUDIO section, an existing A2M instance must be selected from the available options - For the OUTPUT, select the virtual instrument you want to control – this can be an IAA app, an AU, or even an external MIDI instrument connected to an iOS device via USB or Bluetooth
After selecting a virtual instrument, it will automatically appear in the AUDIO section as the INPUT on a new track that you can additionally configure (add audio effects, etc.)

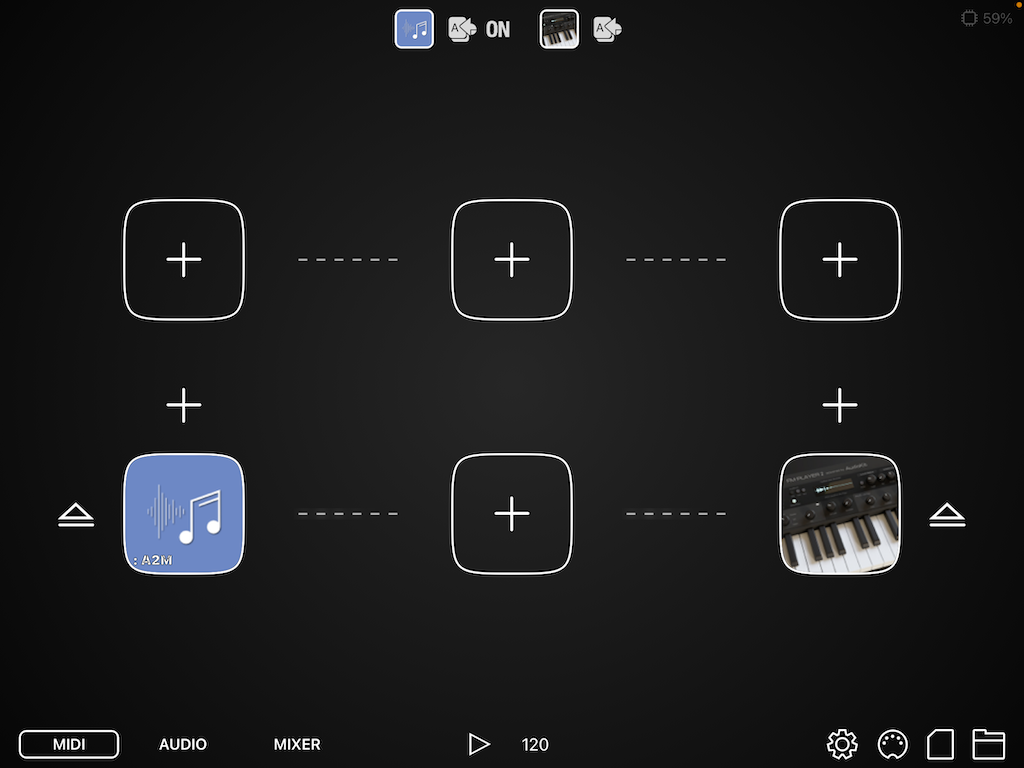
AUM
- Add a new AUDIO track
- Mute the track (“M” button) or unload the default hardware destination (swipe left)
- As SOURCE, select the appropriate audio interface input to which the physical instrument is connected (Hardware Input)
- Select A2M (Audio Unit Extension) as the audio effect
- Add another AUDIO track
- As SOURCE, select the virtual instrument you want to control – this can be the IAA, AU, or any other of the available options
- In the MIDI ROUTING section, set up the connection between the A2M and your virtual instrument

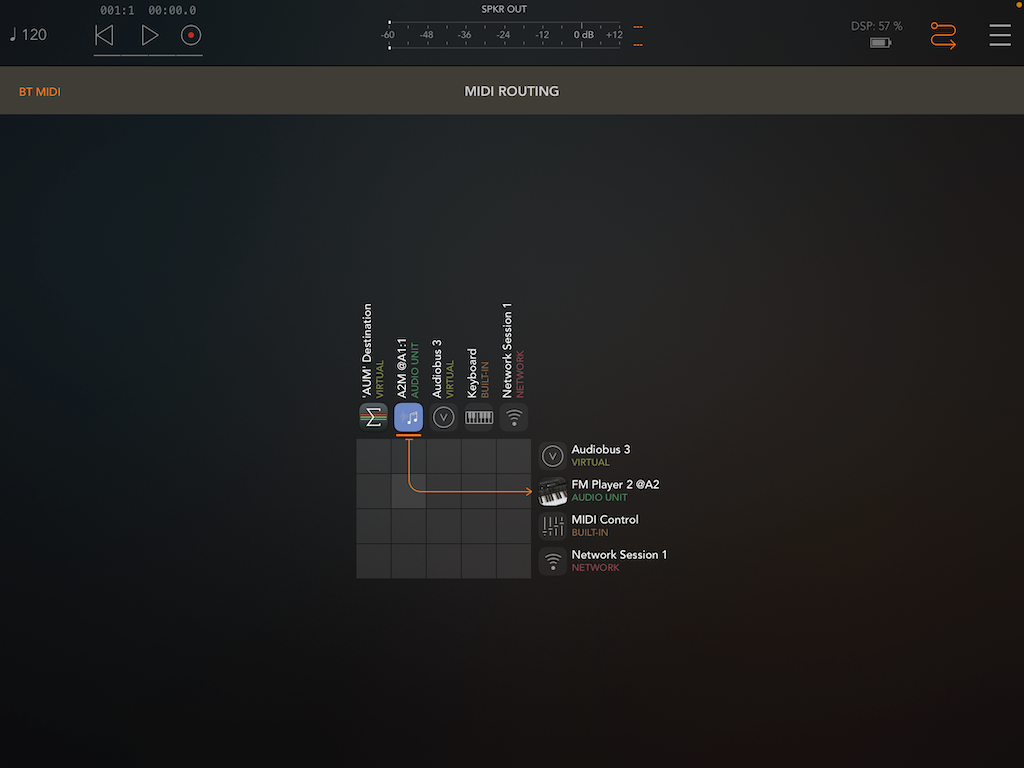
apeMatrix
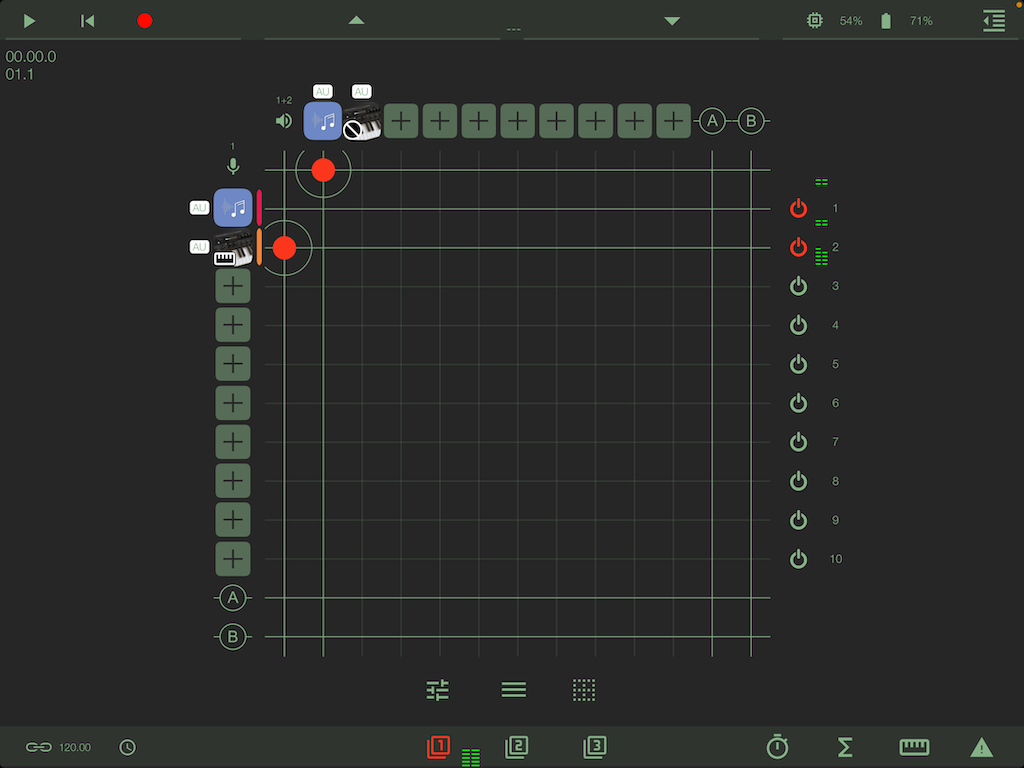
- In matrix, click the “+” button on the left side to add a new SOURCE and select A2M
- Click on the red connection point between A2M and the audio output to remove it – it will not be needed
- Click on the appropriate point on the grid to establish a connection between the audio input to which the physical instrument is connected and the A2M plugin
- Add another SOURCE – the virtual instrument you want to control (or MIDI output to an external module)
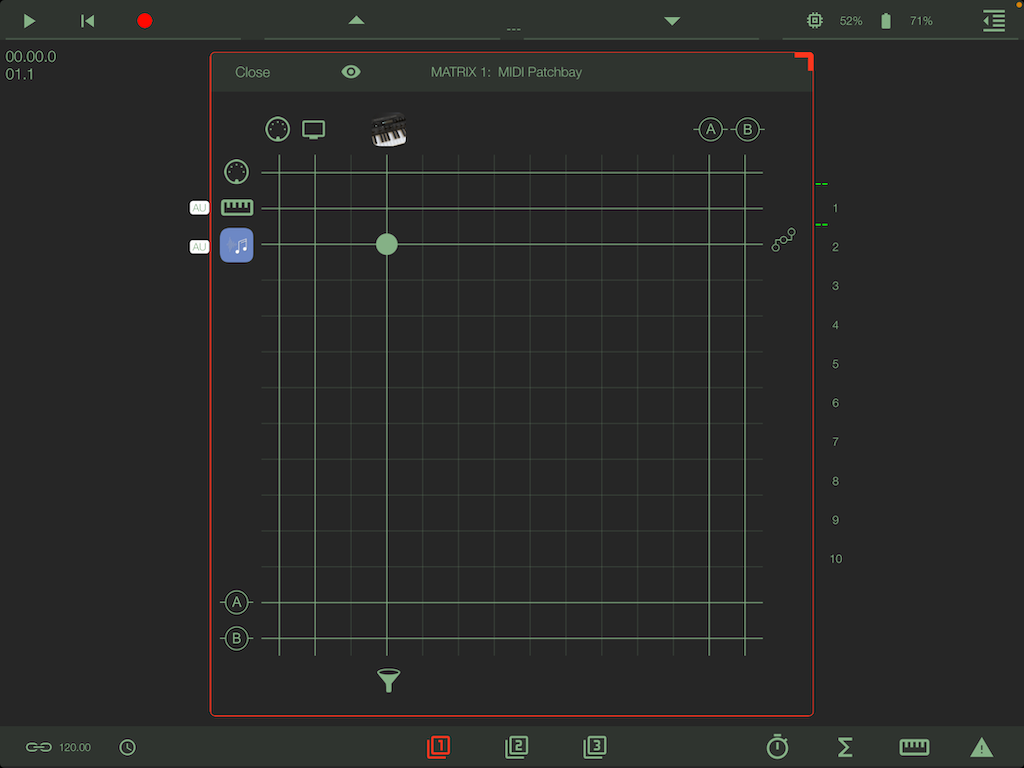
- Go to the MIDI Patchbay section by clicking on the “matrix” icon
- Connect the A2M MIDI output to the input of a virtual instrument of your choice by clicking on the appropriate point on the grid
macOS
Logic Pro X
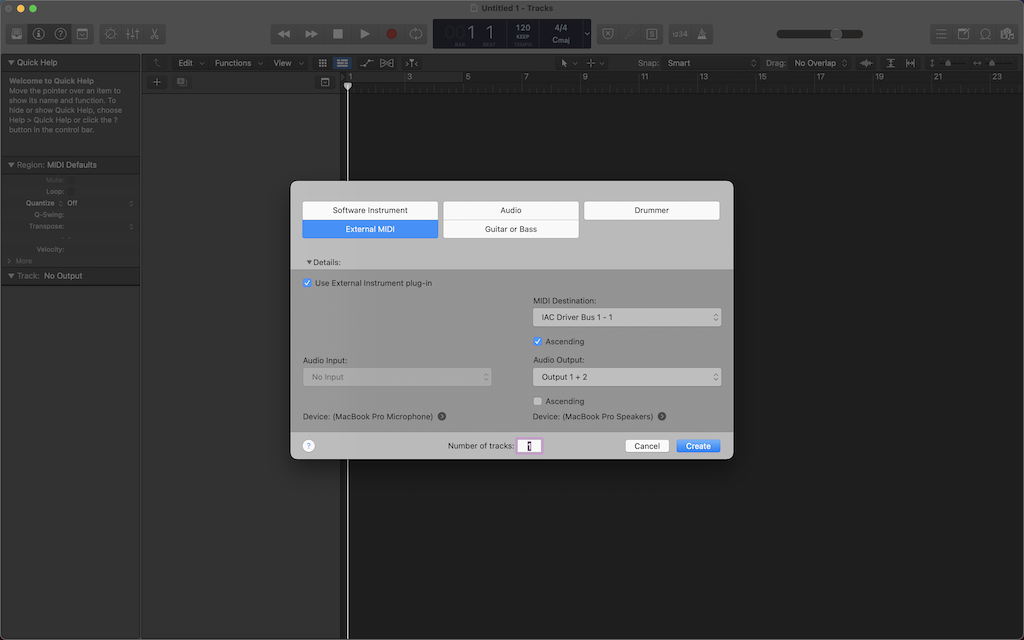
In order for A2M to function as an AU plugin in Logic Pro X, a fairly simple trick has to be used to ensure proper MIDI routing.
- Add a new “External MIDI” track
- Select the option “Use External Instrument plug-in”
- For “Audio Input”, select the channel to which the physical instrument is connected. If this option is not available at this stage, please do so in the plugin “External Instrument” window, which will be available in the Channel Strip.
- Select “IAC Driver Bus → Channel 1” as “MIDI Destination”
- (Optional) If IAC Driver is not available, activate it in the system. For this purpose:
- Run the built-in “Audio MIDI Setup” application
- Click the “Window” menu and select “Show MIDI Studio” (or press ⌘2)
- Double-click the “IAC Driver” icon
- Select the “Device is online” option
- In Channel Strip, select Audio Unit A2M as MIDI FX
- Add a new “Software Instrument” track and select the plugin you want to control via MIDI.

Troubleshooting
Although Logic Pro X sends the signal from the audio input to the MIDI FX A2M plugin, it does not always correctly set the AU's sample rate.
A2M is set to 48 kHz by default, so if your Logic project is set to 44.1 kHz, the recognized pitch may be incorrect (higher in this case).
Changing the project settings to 48 kHz solves this problem.
Parameters
Host
- Audio input buffer size
The smaller the buffer, the higher the CPU load and the lower the latency.
A buffer less than 512 should only be set if you have a strong processor.
For A2M standalone applications, the buffer size is available in the application settings under Audio Settings → Buffer Size
Plugin
- Pitch recognition method
A2M offers two popular algorithms- Based on autocorrelation, the beat bars proprietary method
- FFT (with parabolic interpolation)
- Gate Threshold and Input Gain
A2M works best when it only recognizes sounds at an appropriate volume level.
In order to eliminate unnecessary background noises, select the appropriate value. - Latency / Accuracy
2 dashes (default) – the best compromise between accuracy and latency.
The higher the accuracy, the more of the CPU’s capacity is used and the longer the latency (as opposed to the audio buffer size settings). - Velocity Gain
It allows you to select the appropriate volume of the virtual instrument itself.